Runbook Execution
Runbook Execution
There are three primary methods by which a Runbook can be executed:
- Manual execution, via the Execute link while in the Runbook, viewing an interactive wiki page, using a web browser, or through the command line.
- Automatically using a scheduled execution or Action Task that calls a Runbook.
- By an external process, such as a gateway or Web Service.
Specifically, the methods to execute Runbooks are:
Basic methods:
- Direct execution
- Redirected from task or other Runbook
- Through a user interface action (such as a wiki page button)
- Scheduled job
- From a URL
- Task execution
- Runbook execution
Advanced methods:
- Database poll
- Gateway (such as Netcool)
- From the command line
- Through a Web Service call
Execution Architecture
Runbooks are executed in parts by various Resolve Actions Pro components. The RSControl server oversees process execution but delegates the bulk of individual task execution to one or more RSRemotes. The important distinction is that the RSRemote runs an ActionTask Content, while the RSControl runs the Assessor and thus determines the next step in the process.
When a Runbook is executed, the results of Action Tasks executions are stored in the Worksheets, which can also be displayed in the Runbook wiki document page.
An ActionTask consists of Preprocessor and for each target, after the Preprocessor has run, a given task component will be run. The result of this task components then becomes data into the Parser and Assessor and the result will be available through a worksheet.

When executing, the Automation has access to:
- INPUT, OUTPUT and FLOW values
- GLOBAL variables
ActionTasks have multiple parts: preprocessor, parser, assessor.
Preprocessor
- Accesses:
- previous OUTPUT values
- FLOW values
- GLOBAL variables
- Returns:
- TARGET values to the ActionTask
Within the ActionTask, each 'task' is sent to an RSRemote:
- RSRemote selection is controlled by:
- TARGET variable
- QUEUE_NAME option
- RSRemote gets:
- The executable info
- The values of Properties (FLOWS and INPUTS variables)
- RSRemote returns:
- FLOWS variables, INPUTS, and RAW values
Parser
Parsers are shared (referenced), they cannot be local to an ActionTask. They parse commonly formatted data and return a structured object for use of the Assessor. Parsers run on RSControl server and:
- Have access to RAW value (return from content)
- Create DATA value ( formatted for use by Assessor)
Assessor
This is the last step of the Process Execution. The Assessor runs on the RSControl server and:
- Has access to the:
- DATA and RAW values
- INPUTS, GLOBALS, FLOWS, PROPERTIES
- Creates:
- OUTPUT variables
- RESULT structure, which contains condition, severity, summary, detail. The creation of the structure supports the display for the UI and also supports the condition which will help control the execution of the process.
Choosing Runbook Execution Options
Automated processes can be executed in multiple ways, depending on the use case and other factors. There are multiple modes of user interaction involved with Runbook execution:
- Cascading Runbooks - Each Runbook ends with a redirection of the user to the next Runbook to use. This is useful when the progression of Runbooks is pre-determined, and periodic input from the user is required to continue.
- Decision Tree-driven - A Decision Tree contains embedded Runbooks that the user executes. This is useful when the progression of steps requires user decisions as well as input, and the process is temporary.
- Event-driven - Events are used to pause automation while an external action is completed to trigger resumption. This is useful when the user will navigate away from the automation for a long time period before restarting the process. The process should be of a long duration.
- Form-driven - Forms are used to trigger or resume (from an event) Runbooks that process user-entered data. This is useful when the process requires repetition or large amounts of data entry.
Executing Runbooks Directly
One method to execute Runbooks is to direct execution through the Actions Pro user interface. To execute a Runbook directly
- Access the Runbook wiki document (search or browse).
- Switch to the Automation tab screen.
- Select the execute "Play" button from the Runbook editor toolbar.
If there are unsaved changes in the Automation Designer, the button is disabled.noteYou can only execute the latest version of the Runbook. If you are using an older version of the Runbook, you are prompted to load the latest version.
- Choose the desired options and click Execute.
Direct execution can also be used when developing a Runbook or ActionTask.
The Debug option records the Runbook execution steps to the Debug log, accessible in the corresponding Worksheet edit screen.
The Mock option skips actual RSRemote execution of task content, and substitutes the specified mock data as RAW data to send to the Parser and Assessor.
Business logic is isolated to the Assessor for convenience in maintenance and testing.
Mock execution is generally used to evaluate errors or variations in "good" conditions in ActionTasks and Runbooks without the problems associated with the requirements. The name entered in the mock data set field should match a mock data set name that is available to all tasks in the automation. Mock data can be edited in each individual ActionTask Mock tab view (see the ActionTask Development).
Executing Runbooks from Wiki Page
This method of manual Runbook execution from a Wiki page is done through standard HTML forms. A Wiki can be adapted to meet the user's specific needs. An HTML form on the Wiki page is defined to gather necessary inputs from the user. Upon form submission, it triggers the execution of the Runbook. The results are stored in a Worksheet and can be displayed in the Wiki document page. An HTML form can be created or a Custom Form can be added in the Wiki Builder to define and submit the form.
There are two general options for the form:
- Normal – Execute the Runbook and "Goto" the page
- AJAX – Execute the Runbook in place:
- No page-level refresh
- Needed for embedded/dynamic pages such as Decision Trees
In general, the AJAX method is preferred for best compatibility with most Actions Pro functionality. The traditional form submit may be preferable for initiating redirects.
Runbooks can also be executed from a Wiki page within a Decision Tree.
HTML Form Example
The following sample HTML form executes a process associated with "Runbook.WebHome" using a new worksheet and an input parameter of MYNUMBER set by the user.
<form action="$wiki.action.execute">
<input name="action" value="EXECUTEPROCESS" type="hidden">
<input name="PROBLEMID" value="NEW" type="hidden">
<input name="PROCESS_DEBUG" value="false" type="hidden">
<input name="wiki" value="Runbook.WebHome" type="hidden">
Enter Number: <input name="MYNUMBER" value="0">
<input value="Execute" type="submit">
</form>
When the HTML form button executes, the wiki page is directed to "Runbook.WebHome". To stay on the current page, insert the following code line (with the appropriate namespace), before the last "Execute" input line.
<input name="REDIRECT" value="/resolve/service/wiki/view/<WIKI_NAMESPACE>/<WIKI_NAME>" type="hidden">
AJAX Example
This sample form launches the automation associated with the current wiki page on the (default) Active Worksheet, passing the parameter MYNUMBER.
<form name="form1" action="$wiki.action.execute">
<input type="hidden" name="WIKI" value="$currdoc.getFullName()"/>
<input type="hidden name="PROBLEMID" value="ACTIVE"/>
<input type="input" name="MYNUMBER" value="param value"/>
<input type="button" name="Execute" value="Execute" onclick= "$wiki.action.executeRunbook('form1');" />
</form>
Executing Runbooks from URLs
Typically, this method is performed in a web interface (browser) with an HTTP GET or POST request. When a user navigates to the URL address, execution is triggered. To start a simple Runbook without redirecting to another Wiki page, use the following URL Syntax. Note that "NAME=VALUE" is optional and can be entered multiple times, each time for a different parameter.
http://<host:port>/resolve/service/execute?username=username&password=password&ACTION=EXECUTEPROCESS&WIKI=RunbookName&NAME=VALUE
For example:
http://localhost:8080/resolve/service/execute?username=admin&_password=resolve ACTION=EXECUTEPROCESS&WIKI=Runbook.WebHome&IP=127.0.0.1
Parameters
| Variables | Descriptions |
|---|---|
| username | Actions Pro username to execute the Runbook |
| password | Actions Pro password for username |
| WIKI | Module and name of wiki page or Runbook to be executed (required if a Runbook execution), for example, "test.test1" |
| NAME/VALUE | Parameter name and value for input parameters needed by the Runbook or Action Task, if any |
| ACTIONNAME | Name of the Action Task to be executed (required if an Action Task execution) |
| ACTION | EXECUTEPROCESS or PROCESS for Runbook and EXECUTETASK or TASK for ActionTask (required) |
| PROBLEMID | Default is CURRENT Active worksheet; set to NEW for a new worksheet or specify the Worksheet SYSID for a specific worksheet (should match PROBLEMID from execution): for an archived Worksheet, PROBLEMID is the only parameter a client can pass. |
| PROCESSID | Default is CREATE, or else will be NULL, or Actions Pro ProcessRequest SysId |
| USERID | User executing the Action Task or Runbook (required and should be the same as username) |
| REDIRECT | Redirect URL after the execution of Runbook, with hex values to encode special characters, for example: %2Fresolve%2Fservice%2Fwiki%2Fview%2FTest%2Ftest1 |
| QUERYSTRING | Parameters that get passed to REDIRECT URL |
| TEXT | Optional parameter passed to the Runbook, can be any PARAM key-value pair |
Starting Runbooks with Current Worksheet
To start a Runbook automation using the default Active Worksheet and redirecting to another Runbook after the execution, use the following syntax. Note that special characters (usually in the REDIRECT URL value) need to be URL-encoded to prevent unexpected behaviour. In other words, the hex values for special characters must be substituted in the query string (use %2F to replace each single whitespace).
http://<host:port>/resolve/service/execute?username=username&password=password&ACTION=EXECUTEPROCESS&WIKI=<WIKI_NAMESPACE>.<WIKI_NAME>=VALUE&PROCESSID=CREATE&REDIRECT=%2Fresolve%2Fservice%2Fwiki%2Fview%2F%2F&QUERYSTRING=username%3Dadmin%26_password_%3Dresolve%26name%3Dvalue
For example:
http://localhost:8080/resolve/service/execute?_username_=admin&_password_=resolve&ACTION=EXECUTEPROCESS&WIKI=Runbook.WebHome&PROCESSID=CREATE&REDIRECT=%2Fresolve%2Fservice%2Fwiki%2Fview%2Fclass%2FactionForm
Starting Runbooks with New Worksheet
To start a Runbook using a new worksheet and redirect to another Runbook after the execution, use the following syntax:
http://host:Port/resolve/service/execute_username_=username&_password_=password&ACTION=EXECUTEPROCESS&WIKI=<WIKI_NAMESPACE>.<WIKI_NAME>=VALUE&PROBLEMID=NEW&REDIRECT=%2Fresolve%2Fservice%2Fwiki%2Fview%2F%2F&PROCESSID=CREATE&QUERYSTRING=username%3Dadmin%26_password_%3Dresolve%26name%3Dvalue
Starting ActionTasks via URL
To integrate an ActionTask, use the following URL syntax:
http://<Actions Pro host>:<port>/resolve/service/execute?action=EXECUTETASK&PROBLEMID=NEW&NAMESPACE=<ActionTaskNamespace>&ACTIONNAME=<ActionTaskName>&<Parameter Name>=<Value>...
For example:
http://localhost:8080/resolve/service/execute?action=EXECUTETASK&PROBLEMID=NEW&NAMESPACE=resolve&ACTIONNAME=wait&INTERVAL=10
To integrate a Runbook, use the following URL syntax:
http://host:Port/resolve/service/execute?_username_=username&_password_=password&ACTION=EXECUTEPROCESS&WIKI=<WIKI_NAMESPACE>.<WIKI_NAME>=VALUE
Synchronous Runbook Execution
You can execute Runbooks either synchronously or asynchronously:
- To execute a Runbook synchronously, change the elements of the beginning URL syntax to include
/runbook:http://host:port/resolve/service/runbook/execute - To execute a Runbook asynchronously, change the elements of the beginning URL syntax to include
/runbook/start:http://host:port/resolve/service/runbook/start
Neither option supports the REDIRECT feature.
Synchronous ActionTask Execution
You can execute Runbooks either synchronously or asynchronously:
- To execute an ActionTask synchronously, change the elements of the beginning URL syntax to include
/actiontask:http://host:port/resolve/service/actiontask/execute - To execute an ActionTask asynchronously, change the elements of the beginning URL syntax to include
/actiontask/start:http://host:port/resolve/service/actiontask/start
Viewing Runbooks using URLs
The following URL syntax can be used to view a Runbook:
http://host:Port/resolve/service/wiki/view/<~~namespace~~>/<~~runbook~~>?_username_=username&_password_=password
For example:
http://192.168.242.129:8080/resolve/service/wiki/view/MyNamespace/MyProcess?username=admin&password=resolve
The Runbook user interface displays without the title banner, navigation toolbar, or other aspects of the Actions Pro UI.
Command Line Execution of Runbooks
Both Runbooks and individual Action Tasks can be executed from a command prompt using the rsexec utility included in Actions Pro installations. Runbooks and Action Tasks get executed from the command line allowing integration into a script. The utility is located in the Actions Pro directory at /opt/resolve/lib/rsexec.jar. To use it, run the execute.sh script from within the installation bin directory at /opt/resolve/bin. You need PATH and CLASSPATH set. The command syntax is:
execute.<sh/bat> -u <username> -p <password> -ip <ipAddress> port <portNo> -at <ActionTaskToExecute> | -rb <RunbookToExecute> -v <inputParameters> | -f <parameterFile> -s <synchronous Setting> -d <detailResult> -atd <Action Task Detail>
Command Line Parameters
The command-line options for the rsexec tool are shown below. The order in which these options are placed in the execution command is not relevant.
| Option | Required? | Description | Example |
|---|---|---|---|
-u | Y | Name of user for local Actions Pro installation to authenticate | -u admin |
-p<password< td=""></password<> | Y | Password for the specified user | -p password |
-ip | Y | IP address of the Actions Pro server | -ip 127.0.0.1 |
-port | N | Actions Pro server web UI port (default is 80) | -port 8080 |
-at | N | Full name of ActionTask to execute | -at "Namespace.ActionTask" |
-rb | N | Full name of Runbook to execute | -rb "Namespace.Runbook" |
-v | N | Any input parameters for executed item, in form "=&=…" (see also –f ) | -v maxWait=300&maxChars=100 |
-f | N | Parameter file to use instead of specifying parameters in the command line | -f C:/AppFiles/params.properties |
-s | N | Execute synchronously ("Y" or "N", default "N") | -s Y |
-d | N | Return RESULT.detail results ("N" for RESULT.summary only) | -d Y |
-atd | N | If –rb option is specified, then this includes detail output for specific task, in form "#(:" | -atd "ActionTask#Runbook(Test.ts1::1)" |
Scheduled Execution of Runbooks with Job Scheduler
One method to execute a Runbook is to execute on a scheduled or periodic basis. Actions Pro includes a scheduler that can trigger a Runbook execution based on a "cron" expression. The Job Scheduler allows you to schedule a Runbook to execute automatically, based on either a time interval (e.g., every 10 minutes) or specific times and days (e.g., at noon and midnight on Tuesdays and Thursdays).
To schedule a job, navigate to the System Administration > Job Scheduler. The Job Scheduler lists all scheduled jobs, which can be activated, deactivated, deleted, or executed immediately. You can review and edit a specific schedule from the list by clicking on the View details icon next to the schedule to bring up the job edit screen. Remember to click Save to save any changes.
Scheduled executions are based on the date/time of the Actions Pro server, and not on the user local time, which may be different. As always, ensure that date/time is synchronized across all servers in the cluster.
To schedule a new job, select New from the toolbar and specify the following values:
- Name: The name of the scheduled job. This value will be converted to ALL UPPERCASE.
- Module: Module name for scheduled job, used to import or export the job.
- Runbook: The full name, with namespace, of the Runbook to be executed, for example "Runbook.WebHome".
- Schedule settings (see below for syntax examples).
- Time Range: (optional) The job will only be active between these dates.
- Parameters: (optional) Parameters to be passed to the Runbook automation.
The following special characters can be used in the Schedule section in a job edit screen to help specify unusual dates or times.
| Character | Description | Example |
|---|---|---|
| Asterisk (*) | all values | The * in the "Minutes" field means every minute |
| Question Mark (?) | No specific values | Used to specify something in one of the "Day of month" or "Day of week" field, but not the other |
| Dash (-) | Specifies ranges | "10-12" in the "Hours" field means the hours 10, 11 and 12 |
| Comma (,) | Specifies additional values | "MON,WED,FRI" in the day-of-week field means the days Monday, Wednesday, and Friday |
| Forward Slash (/) | increments | "0/15" in the "Seconds" field means the seconds 0, 15, 30, and 45 while "5/15" in the "Seconds" field means the seconds 5, 20, 35, and 50; in the "Month" field, "*/3" means every third month |
| Letter "L" | last | "L" is useful when you need to specify the last day-of-month or last day-of-week |
| Letter "W" | weekday | Specifies the weekday (Monday through Friday) nearest the given day (this can be the proceeding day) |
| Hash Mark (#) | N-th day of month | "6#3" in the "Day of week" field means the third Friday of the month |
The following table provides further examples of the special characters in use. The Expression column in the Scheduled Jobs List follows this standard format.
| Expressions | Description |
|---|---|
| 0 0 12 * * ? | Fire at 12 pm (noon) every day |
| 0 15 10 ? * * | Fire at 10:15 am every day |
| 0 15 10 * * ? | Fire at 10:15 am every day |
| 0 * 14 * * ? | Fire every minute starting at 2 pm and ending at 2:59 pm, every day |
| 0 0/5 14 * * ? | Fire every 5 minutes starting at 2 pm and ending at 2:55 pm, every day |
| 0 0/5 14,18 * * ? | Fire every 5 minutes starting at 2 pm and ending at 2:55 pm, AND fire every 5 minutes starting at 6 pm and ending at 6:55 pm, every day |
| 0 0-5 14 * * ? | Fire every minute starting at 2 pm and ending at 2:05 pm, every day |
| 0 10,44 14 ? 3 WED | Fire at 2:10 pm and at 2:44 pm every Wednesday in the month of March |
| 0 15 10 ? * MON-FRI | Fire at 10:15 am every Monday, Tuesday, Wednesday, Thursday and Friday |
| 0 15 10 15 * ? | Fire at 10:15 am on the 15th day of every month |
| 0 15 10 L * ? | Fire at 10:15 am on the last day of every month |
| 0 15 10 ? * 6L | Fire at 10:15 am on the last Friday of every month |
| 0 15 10 ? * 6# 3 | Fire at 10:15 am on the third Friday of every month |
Gateways and Adaptors
Gateways and adaptors are integration points that connect Actions Pro to external systems. They either operate independently (gateways) or are invoked in an ActionTask content. One way to execute Runbooks is through Actions Pro gateways between computer programs, such as Netcool, Email, Database Gateway, and so on.
Gateways
Gateways are services that allow Actions Pro to integrate with third-party systems, such as Trouble Ticketing. They typically invoke a Runbook based on a defined condition. Gateways are persistent connections or connection pools that get established at startup. They provide bi-directional connectivity, as well as reducing the overhead of establishing a new connection on every Runbook. Some gateways provide high availability and failover. Actions Pro gateways can be configured (in blueprint.properties file and Gateway Administration menu) to match certain criteria to automatically trigger Runbook execution.
The following table lists the available gateways.
| Gateways | Latest Third-Party Product Version Support |
|---|---|
| CA Spectrum | CA Spectrum 10.x |
| ServiceNow Gateway | ServiceNow Madrid |
| Netcool Gateway | IBM Netcool 8.x |
| Email Connect | N/A |
| EmailConnect2 | N/A |
| EWS Gateway | All Versions supported |
| Email Gateway | N/A |
| Exchange Gateway | N/A |
| FTP | N/A |
| Salesforce Gateway | ?? |
| HTTP | N/A |
| SMTP | N/A |
| SNMP | N/A |
| SSH | N/A |
| Database Gateway | DB2, SQL, MySQL, MariaDB, PostGres, Oracle, Sybase |
| Remedy | Remedy 9.x |
| AMQP | N/A |
| Telnet | N/A |
| Terminal Emulation TN3270 (MainFrame) | N/A |
| Terminal Emulation TN5250 (MainFrame) | N/A |
| XMPP | N/A |
| Splunk Gateway | Splunk 7.x |
| Splunk Pull Gateway | Splunk 7.x |
| Jira Service Desk | Jira Service Desk 4.x |
| QRadar Gateway | IBM QRADAR SIEM 7.x |
| QRadar Pull Gateway | IBM QRADAR SIEM 9.x |
| AssureNow Gateway | Federos AssureOne 4.x |
| SCOM Gateway | MS SCOM 2012R2 |
| CAServiceDesk Gateway | CA Service Desk 14.x |
| McAfee Gateway | McAfee ESM 10.x |
| MoogSoft Gateway | Moogsoft AI/Ops 7.x |
| Solarwinds Gateway | Solarwinds NPM 12.x |
| IBMMQ Gateway | IBM Websphere MQ 8.x |
| JMS Gateway | Weblogic 14c or Weblogic 12c using wlthint3client.jar from the 14c version (as that from the 12c version is not compatible with OpenJDK 11) |
| ArcSight Gateway | ArcSight ESM 6.8c |
| Kafka Gateway | Kafka 2.2 |
| Zenoss Gateway | Zenoss 6.x |
| Groovy Gateway | N/A |
| Gateway Builder | N/A |
Pool Gateways
They provide support for other gateways but also code classes that enable you to limit access, for example in a database connection pool.
Pool gateways facilitate the share of connection between the gateway and the customer code, written in an ActionTask. That limits the number of connections that can be made to a gateway and provide a wait state in case connections are available, rather than failing to connect.
Adaptors
Similar to gateways, adaptors are code classes accessible from Groovy that use APIs to perform actions on external systems. Actions Pro provides library and documentation for these APIs. The adaptor API libraries are invoked from an ActionTask to talk to other systems over a temporary session. Such sessions can be used for several ActionTasks which are disconnected once the usage completes. Some adaptors may need to be enabled in the blueprint.properties file before they can be used properly.
The following is the list of provided adaptors:
- SSH Connect
- Telnet Connect
- TN3270Connect
- TN5250o Connect
- VT Connect
- Web Services
- Web Connect
- Apache POI
- Email Connect
- Sockets Connect
- Database Connect: DB2, Sybase, Oracle, MySql, Postgres, MSSQL, Informix
Web Service Execution of Runbooks
Runbooks can be executed through a Web Service for external calls. To call the Actions Pro Web Service from within an Actions Pro Runbook or from a third-party tool, use the WebServiceConnect Listener. The Web Service Descriptive Language (WSDL) for connecting to the Actions Pro Web Service is retrieved using:
http://<IP address>:<Port>/resolve/webservice/WebserviceListener?wsdl
There are additional APIs available for the service. Contact your Actions Pro representative for information on additional APIs.
Runbook execution is a 3-step sequence:
- Log in.
- Start the Runbook method.
- Log out.
It is also possible to execute with login in one method using the "startRunbookWithLogin" method. Parameters (INPUTS, etc.) can be passed by name. The preferred methods to use are "simpleStartRunbook" and "simpleExecuteRunbook".
Web Service Initiation Steps
When using Actions Pro to call the Web Service, follow these suggestions:
- Create and test the XML for the Web Service calls to be used
- Use a tool such as SoapUI
- Write the Groovy Web Service calling code for the ActionTask for each Task to be performed
- Write the Groovy code to extract values from the code
- If using multiple ActionTasks, a parameter needs to be used to pass the Login token
Examples
Logging In
<soapenv:Envelope xmlns:soapenv=http://schemas.xmlsoap.org/soap/envelope/ xmlns:xsd="http://www.resolve-systems.com/resolve/WebServiceListener/xsd">
<xsd:login>
<soapenv:Body>
<soapenv:Header/>
<!--Optional:-->
<xsd:username>admin</xsd:username>
<!-Optional:->
<xsd:password>resolve</xsd:password>
</xsd:login>
</soapenv:Body>
</soapenv:Envelope>
Result:
<soapenv:Envelope xmlns:soapenv="http://schemas.xmlsoap.org/soap/envelope/">
<soapenv:Body>
<ns:loginResponse xmlns:ns="http://www.resolve-systems.com/resolve/WebServiceListener/xsd">
<ns:return>356621428319665</ns:return>
</ns:loginResponse>
</soapenv:Body>
</soapenv:Envelope>
Extract the Login token (assumes result is in a string called "lines"):
Def info = new XmlParser().parseText(lines)
Def token = info.depthFirst().find() { it.name() == 'ns:return' }.text()
Starting Runbook XML
<soapenv:Envelope xmlns:soapenv=http://schemas.xmlsoap.org/soap/envelope/
xmlns:xsd=http://www.resolve-systems.com/resolve/WebServiceListener/xsd xmlns:xsd1="http://webservice.resolve.com/xsd">
<soapenv:Header/>
<soapenv:Body>
<xsd:executeRunbook>
<xsd:token>356621428319665</xsd:token>
<!—Zero or more repetitions:-->
<xsd:params>
<xsd1:name>WIKI</xsd1:name>
<xsd1:value>class.simple</xsd1:value>
</xsd:params>
</xsd:executeRunbook>
</soapenv:Body>
</soapenv:Envelope>
Result:
Below are partial results for the Start Runbook XML (headers and other XML removed).
<ax21:name>PROCESSID</ax21:name>
<ax21:value>ff8080813185a4ec0131875c81c500ad</ax21:value>

<ax21:name>STATUS</ax21:name>
<ax21:value>COMPLETED</ax21:value>

<ax21:name>WORKSHEET NUMBER</ax21:name>
<ax21:value>PRB23-50</ax21:value>

<ax21:name>WORKSHEET ID</ax21:name>
<ax21:value>ff8080813185a4ec0131875c81be00ac</ax21:value>

<ax21:name>RUNBOOK</ax21:name>
<ax21:value>class.simple</ax21:value>
Logging Out
<soapenv:Envelope xmlns:soapenv=http://schemas.xmlsoap.org/soap/envelope/ xmlns:xsd="http://resolve-systems.com/resolve/WebServiceListener/xsd ">
<soapenv:Header/>
<soapenv:Body>
<xsd:logout>
<!--Optional:-->
<xsd:token>356621428319665</xsd:token>
</xsd:logout>
</soapenv:Body>
</soapenv:Envelope>
Executing Runbooks from Assessors
A process executes another Runbook as a sub-Runbook, inserted into the automation model. An alternative method to execute a Runbook is from an individual ActionTask, from an ActionTask Assessor script. The script sends a JMS message to RSControl with parameters that determine which Runbook to execute. Any parameters not listed below get passed as PARAMS to the executed Runbook.
Required Params
params["WIKI"] = "Namespace.Name";
params["PROBLEMID"] = "NEW"; // New worksheet
params["PROBLEMID"] = PROBLEMID; // Same worksheet
params["USERID"] = USERID;
Optional Params
params["REFERENCE"] = "Reference"; // Worksheet Reference value
params["SUMMARY"] = "Summary"; // Worksheet Summary value
params["DETAIL"] = "Detail"; // Worksheet Detail value
params["PROCESS_DEBUG"] = "true" // Use Debug execution
Set Delay
- MMs Options
options = new MMs Options();
options.setDelay(delay); // delay in seconds - Send request to Execute Runbook
ESB.sendMessage("RSCONTROL", "MAction.executeProcess", params); // no delay
ESB.sendMessage("RSCONTROL", "MAction.executeProcess", options, params); // delay
Code Example for Assessor
The following sample code below shows Groovy code to initiate the Runbook "Runbook.WebHome".
Import com.resolve.esb.MMsgOptions
Map params = new HashMap()
params["WIKI"] = "Runbook.WebHome"
params["PROBLEMID"] = PROBLEMID
params["USERID"] = USERID
MMs Options options = new MMs Options()
options.setDelay(5)
ESB.sendMessage("RSCONTROL", "MAction.executeProcess", options, params)
The following sample code line can be substituted into the above example to create a new Worksheet instead of using the current one.
params["PROBLEMID"] = NEW
The setDelay() function is optional. If used, the message will wait for a specified number of seconds before starting execution.
Automation Execution Results
Runbook task results can be viewed by navigating to the active Worksheet. The START and END tasks are components of the automation model that indicate the start/end of the sequence. If there is no END task result listed, or ActionTasks are executed after the END task, then the automation should be checked for errors.
The execution status (whether opened, completed, or aborted) of any process or task in a Runbook can be checked with the Request History main menu. Execution results, however, are typically preferred to be displayed on the Runbook wiki page for the benefit of users who might not have access to Worksheets. The {result} markups will show Worksheet-like results on the wiki page, while the {detail} markups will show task detail output.
Viewing the immediate automation results during Runbook development helps to spot potential problems with the process. There are generally three categories of problems:
- Automation does not start execution.
- Actual automation results differ from expected results (logical error).
- Automation does not terminate as expected.
- The automation might timeout (default timeout threshold is 10 minutes, configurable in the Start task)
- The process ends without completing all expected ActionTasks
Use the automation results in conjunction with appropriate log files to troubleshoot automation errors.
- Add trace or debug information to ActionTasks
- Replace ActionTasks in the automation model with a no-op (no operation) task, specifically, the "noop" wait task with 0-seconds interval
- Or consider a generic message task ("comment") for feedback
- Verify all parameters to assure values are passed
- Create a task that displays the state of all variables
- Also check RSControl/RSRemote logs to verify where values change
- Check operational status of Actions Pro components and communications
Checking Runbook Execution Status
Each Runbook execution creates a Process Request which consists of multiple Task Requests. Process and Task Requests are mainly used for auditing and troubleshooting purposes. Older Process and Task Requests can be archived to maintain active tables at manageable sizes.
To view the execution status of an automation process, go to the Request History menu and select to view either Open or Completed Process Requests. The Aborted Processes can also be seen. Any of the Process Request lists display the most recent Runbooks filtered by corresponding execution status.
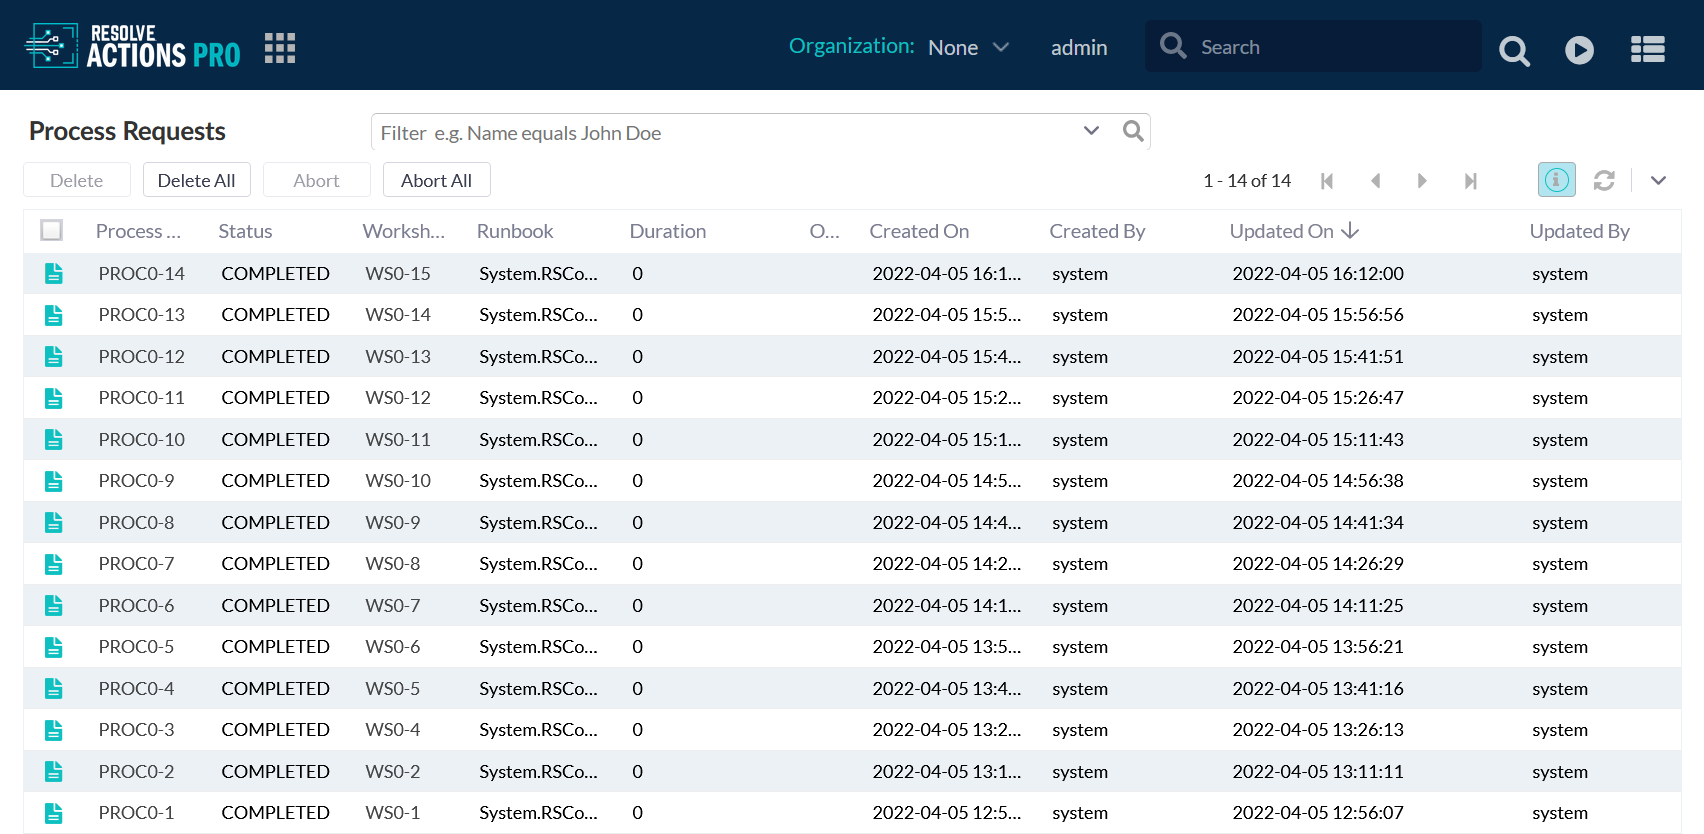
Only OPEN process requests can be aborted. Process in status COMPLETED cannot be aborted.
The System Information icon opens execution duration, timestamp, process user, and other detailed information. То see process details, click the More Information icon or the Process Request number in the process list. Clicking the corresponding WS number under the Worksheet column for a process, accesses the process' Worksheet and displays the Results tab screen.
Searching Runbook Execution Results
If you do not see the process request you are looking for on the first page, then you can perform a quick search in the Search input field by:
- Process request number, using the following expression: Process Request equals "PROC-number"
- Process request Status, using the following expression: Status equals Completed/ Aborted/ Open
- Process request creator, using the following expression: Created By equals "user"
- Worksheet number, using the following expression: Worksheet equals "WS-number"
Advanced Search
If a complex search criterion, that combines several conditions, needs to be applied, use the Advanced search options.
The form contains the following criteria: Process request, Status, Worksheet, Runbook, Duration, Created On, Created By, Updated On, Updated By.
Worksheets
Worksheets are database records that store Runbook execution results. Typically, one Worksheet corresponds to one Runbook execution. It is also possible for a single Worksheet to encompass multiple Runbook executions. This is done when a single Worksheet is retained as the Active Worksheet. Worksheets provide a history or audit log of all Runbook and task executions, as well as statistics on frequency and duration.
There is a system property app.worksheets.retentionHours that specifies how long (in hours) worksheets, created by execution of Runbooks in the System namespace, are kept in the database. It can be configured by a user with admin permissions in System Properties page.
- If the system property value is blank the default value is 24 hours.
- system property value 0 is treated as disabled retention period which is the equivalent of keeping the worksheet results of Actions Pro Runbooks for an indefinite time.
You can control data retention or keep it permanently deleted after it expires. There is a mechanism that removes worksheets that are older than the setting of the app.worksheets.retentionHours system property . That is controlled by app.worksheets.writeToLog system property which enables or disables permanent deletion of worksheet results.
- app.worksheets.writeToLog set to true - after the retention period expires the worksheets data is written to a log file with the name
<INSTALL_DIR>/tomcat/logs/RSSystemWorksheets-MM-DD-YYYY.log. - app.worksheets.writeToLog set to false - after the retention period expires the data of the worksheet is deleted permanently.
When it reaches 32 MB in size, it is zipped in the <INSTALL_DIR>/tomcat/logs/yyyy-MM directory. The format of the file name of the archived file is: RSSystemWorksheets-MM-dd-yyyy-%i.log.zip
%i is a counter in case there are multiple archives for the same day, it will start from 1 and increase for each new file for the same day. The maximum archived log files for a single day is set to 100. This means: if there are 100 log files for the same day, and another one comes, the oldest one is deleted.
Example:
RSSystemWorksheets-02-17-2020-1.log.zip
RSSystemWorksheets-02-17-2020-2.log.zip
If a Runbook is not coded to display its automation results on the wiki page, then you can check the relevant Worksheet. Worksheets can be accessed either through the Worksheet main menu or the Worksheet Selector by clicking on the Worksheet icon of the Actions Pro main toolbar which opens the Select Worksheet dialog.
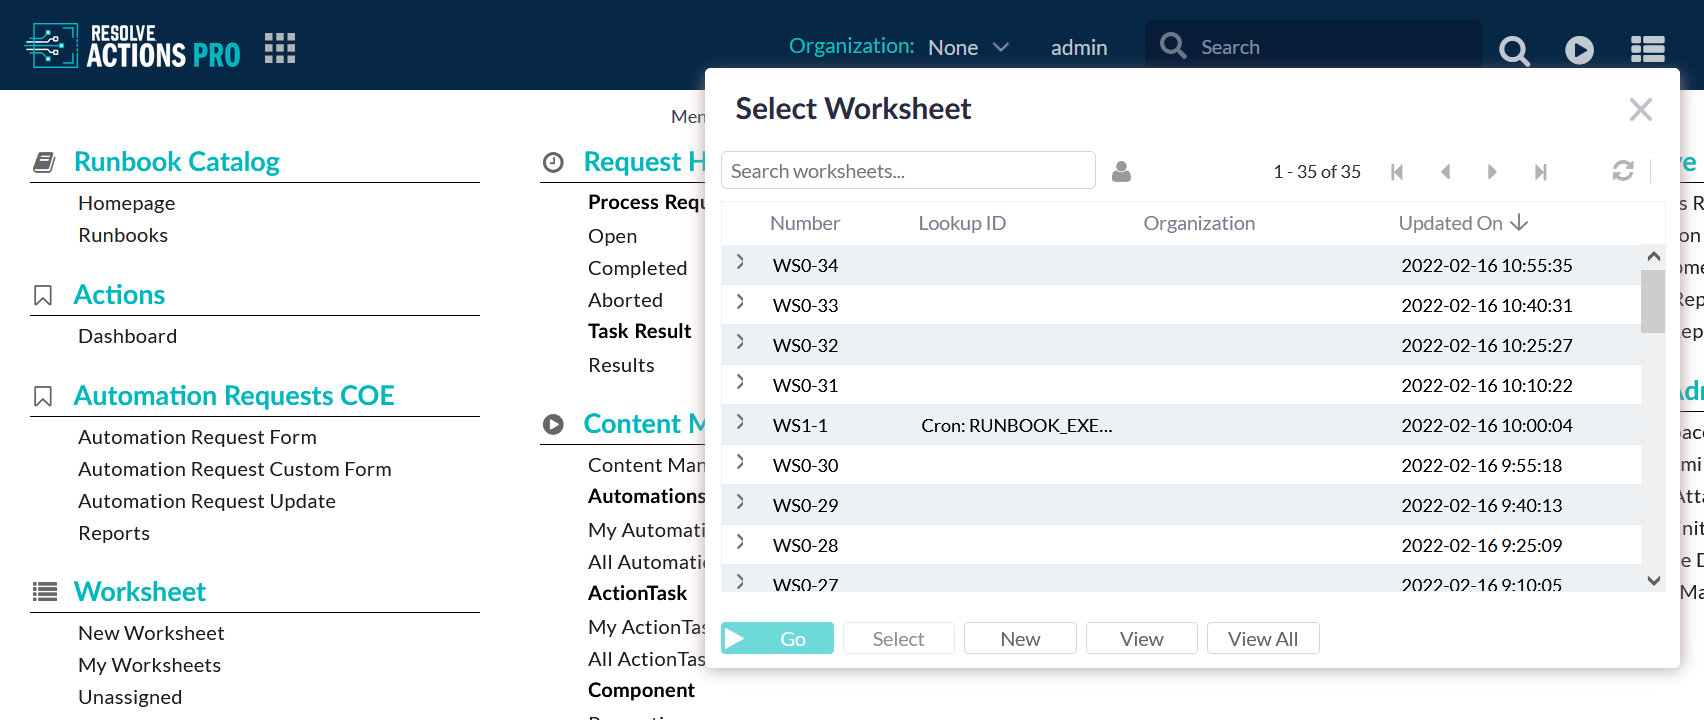
The following table details the Worksheet dialog box UI elements.
| Element | Description |
|---|---|
| Search worksheets... | Searches for an existing worksheet and presents it. |
| My worksheets | Lists only the worksheets executed by the current user. |
| Refresh | Reloads the list of worksheets and updates it if there are new records. |
| Go | Re-execute the selected Worksheet. |
| Select | Makes the selected worksheet in the list as the new "active" worksheet. |
| New | Creates a new worksheet which also becomes the new "active" worksheet. |
| View | Opens the details of the selected worksheet in a new tab. |
| View all | Opens the list of all the Worksheets results. |
Selecting View All opens a list with results of all Runbooks executed so far ordered chronologically from latest to oldest form top to bottom with 50 results per page.
All Worksheets generated by Runbooks in the System Namespace are filtered out by default to reduce unnecessary noise in the results list. Example of Actions Pro System Runbooks are: System.GitPushAutomationChanges, System.GitPullAutomationChanges, System.GitPollAutomationChanges, and System.RSControlHealthCheck. Execution results of these Runbooks can be accessed through a dedicated Show System Worksheets filter button in the Worksheets page.
Viewing Worksheet Details
Selecting a Worksheet and clicking View opens the execution details of the selected Worksheet. Each Worksheet is uniquely identified by a PRB (PRoBlem) number. Every browser tab that executes an Actions Pro task or process displays the PRB number of the associated Worksheet.
Worksheet General Tab
The General tab screen contains essential information about the executed process. The Worksheet may also contain additional reference identifiers ("Alert ID", "Reference", "Correlation ID") which refer to external system IDs from other applications, such as ticketing, fault management, or provisioning systems.
The Condition and Severity fields indicate the success metrics of the Runbook execution. The fields are automatically set by the summarized 'worst' value of the aggregated ActionTask results.
Worksheet Results Tab
The Worksheet Results tab is the default view that is displayed when you open a specific Worksheet. It contains the list of ActionTasks that have been executed and completed along with their values:
- Completion: TRUE/FALSE
- Condition: GOOD/BAD
- Severity: CRITICAL/SEVERE/WARNING/GOOD
Detailed information for each ActionTask can be seen by clicking the plus sign; the System Information or the More Information icons, next to each listed task. The advanced view lists all "Start" and "End" tasks for each ActionTask. The Advanced View button is not selected by default in order to reduce the unnecessary information and noise in the list. If you need to see the "Start" and "End" Task results, select Advanced View button.
Worksheet Debug Tab
The Worksheet Debug tab is used only for diagnostic purposes during Runbook and ActionTask development. It is recommended for the duration of production that Runbooks do not execute in DEBUG mode as an additional performance overhead is incurred.
Worksheet Data Tab
This tab displays JSON data stored in the Worksheet. This includes a record of Decision Tree steps taken (allowing troubleshooting to be resumed), metric data, and any WSDATA stored by the automation. The Worksheet Data Tab is needed for debugging and is not visible by non-developers.
Displaying Runbook Results and Details
The {result} and {detail} tags are used to display automation execution results. Developers should keep in mind some considerations while designing wiki document pages. From a developer perspective, an automation executes and the results of that execution get stored in and viewed in a Worksheet. From the end-user perspective, a wiki page or Runbook may not be accessible in the Actions Pro interface and the end-user may not be familiar with the concept of Worksheets. The developer must decide how to display results to the end-user.
Also, when viewing Runbook and ActionTask results on a document page or Runbook, the results that get displayed are the most recent results retrieved from the Active Worksheet. If there is no Active Worksheet, then results are not available. While developing wiki document pages, helpful information on the {detail} and {result} tags is available in the Source Editor in Wiki Syntax Help. Standard "Result" and "Detail" sections can be added to a document page using the Page Builder (see Page Builder Runbook Sections: Document Developer, the Source Editor, Page Builder Runbook Components).
The {result} Tag
The {result} tag gives the developer some control over the display of execution results to the user. Consider the following automation model. The automation has a few specific logic tasks that handle the looping in the sub-Runbook and do not return results relevant to the end-user.
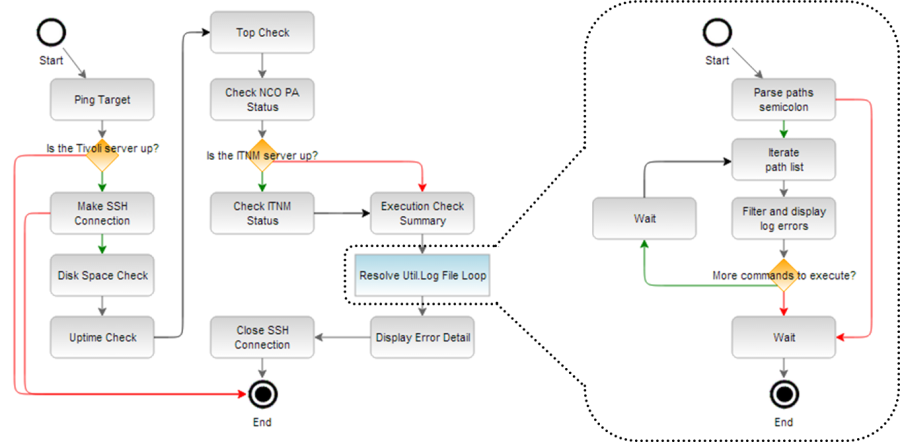
When the automation is executed, the generated Worksheet will list the irrelevant results and can distract the user from the more important results.
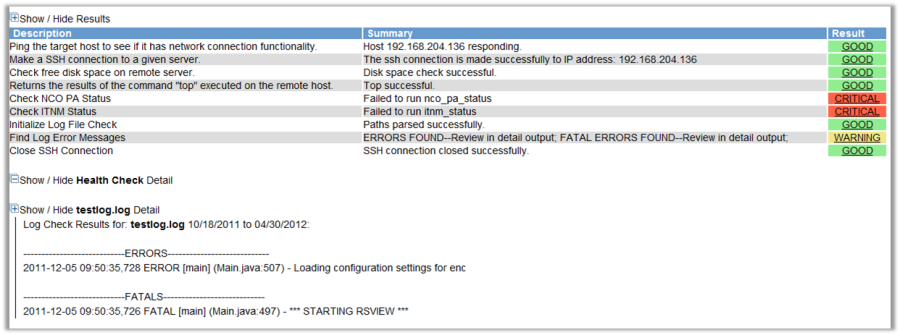
The {result} tag provides options over which results appear on the document page. For example, the following {result} code displays results for only the listed ActionTasks from the sample automation.
{result}
Ping Target
Make SSH Connection
Disk Space Check
Uptime Check
Top Check
Check NCO PA Status > nco_pa_status
Check ITNM Status > itnm_status
Initialize Log File Check > parse
paths semicolon
Filter and Display Log Errors
Close SSH Connection
{result}
Within the tags, the results that are important to the user are listed. The results generated by the tag look similar to those from the Worksheet, but are at a much higher level, showing only the task description, results summary, and condition. The developer must decide how to use the task condition to communicate meaning to the user:
- Green (good) indicates no user action is required.
- Red (critical) indicates that the task failed to execute properly.
- Yellow (warning) indicates that the task executed properly and that the results may require user action.
Each "Result" condition is underlined. When an end-user clicks a "Result" condition, a pop-up window displays the execution details for that task. Click a red (critical) or yellow (warning) condition to discover why the task failed to complete or what the errors might be. The results are determined by the Assessor. It is up to the Runbook developer to decide how the Assessor interprets the results and how those results are communicated to the user.
Displaying Results from Archived Worksheets
By default, the {result} tag does not display old automation results from archived Worksheets. A specific Actions Pro system property called "resultmacro.check.archive" controls whether archived Worksheets can be accessed with the {result} tag, and thus whether a wiki document page can display archived automation results directly on the screen.
Turning system property on allows the {result} tag to query archived Worksheet results in the Actions Pro database entails a performance cost, which is why the system property is set to false by default.
- In the System Administration main menu, click on System Properties item to bring up the "System Properties List".
- Search for the property named "resultmacro.check.archive":
- If the property is set to true, then the {result} tag macro can query archived Worksheets for ActionTask results,
- If none are found in the current active Worksheets saved in Elasticsearch.
- To switch the property value, to either "true" or "false", click the More Information icon and in the Edit System Property dialog, type in the desired value in the "Value" field.
Archived Worksheet results are often displayed in document pages that are referenced via URL. If referencing an archived Worksheet, PROBLEMID is the only parameter a client can pass through the URL.
The {detail} Tag
Below the results section is content generated using detail tags. The {detail} tag enables placement of the Detail results of the Assessor from an ActionTask execution into the wiki page.
The detailed results are set in the Assessor by setting RESULT.detail. The detail can be text, which makes the execution results conveniently available to the user, or it can be HTML that gets rendered in the wiki page.
- To set the detailed results to text, use
RESULT.detail = 'some string' - To set the detailed results to HTML, use
RESULT.detail = Constants.DETAIL_TYPE_HTML + '<HTML code>'
Example:RESULT.detail = Constants.DETAIL_TYPE_HTML + '<h1>Test</h1>'
Using task detail to output in HTML is a technique that developers can use to create dynamic interfaces. For example, the detail of one task can output a form that enables data entry and execution of another automation. A wiki document page can be used as an interactive dashboard or homepage that controls a dynamic, multi-step process.
In the following example, the detail tag generates the HTML for a collapsible section of data (the detail results from the health check and the log file results tasks from the sample automation). Because the Runbook can be used to analyze multiple log files, generating the HTML was necessary to avoid cluttering the wiki page with raw data. The wiki code is:
{detail}
Executive Checks Summary
{detail}
<br/>
{detail}
Display Error Detail
{detail}
The "Display Error Detail" task generates the following HTML, which is placed in the detail:
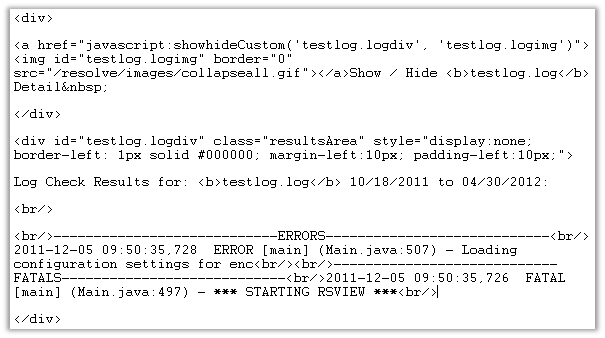
The resulting detail in the wiki document page displays as:
Automation Model Real-Time Results
The {model} tag is used to display the automation model on the wiki document page. It is convenient if a developer designing a wiki document page wants the end-user to see what the Runbook looks like and see execution results in real-time. As a Runbook processes, the automation model is updated and each ActionTask or sub-Runbook changes color with reference to condition and severity.
While developing wiki document pages, helpful information on the {model} tag is available in the Source Editor in Wiki Syntax Help. A standard "Model" section can be added to a wiki document page using the Page Builder.
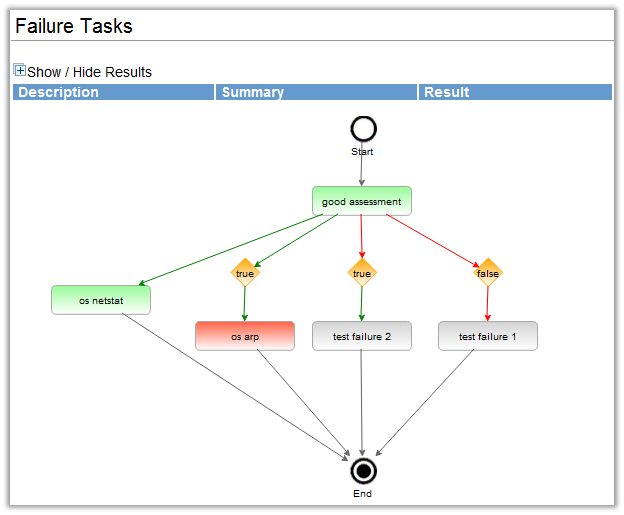
The codes and parameters regarding the {model} tag can be found in the Wiki Syntax Help under "Model". The user can configure the colors based on condition or severity as follows:
Node colors based on condition:
- GOOD: Pale Green
- BAD: Red
- UNKNOWN: Light Cyan
Node colors based on severity:
- CRITICAL: Red
- GOOD: Pale Green
- WARNING: Khaki
- SEVERE: Orange
- UNKNOWN: Light Cyan
The following table shows the parameter and their default values:
| Parameter | Default | Value |
|---|---|---|
| refresh | true | Refresh the automation graph results |
| refreshInterval | 5 | Number of seconds between refresh |
| width | 100% | iframe width in percentage |
| height | 400 | iframe height |
| status | condition | Use condition or severity to determine the node color |
| zoom | 1.0 | Resize the image based on zoom factor (0.2 - 5.0) |
| wiki | current wiki | Full wiki document page name, with namespace |
Sample codes using the {model} tag:
Default option, using current wiki automation:
{model}
{model}
Severity option:
{model: refresh=true|refreshInterval=5|width=100%|height=400|status=severity|zoom=0.8}
{model}
Archive History
By default, Worksheets and other Actions Pro records are archived after a period of activity. To learn how the archiving mechanism works, how to configure it, and how to view archived records, see the Data Management Guide.
Copying Only the Automation Model
To copy only the automation model itself, rather than the entire Runbook with its wiki page, go to the document editor. Switch to the Automation tab and select the desired model tab (Main model or Abort model).
- In the Automation Designer toolbar, click the "Show XML" option under the "Menu" button.
- The underlying XML representing the model is displayed in a new browser tab.
- Copy the XML to the clipboard.
- Navigate to the new model "Show XML" tab.
- Paste in the original model XML.
- Click Save to retain the changes.
Actions Pro Programming Practices
Following Runbook development best practices in programming can simplify troubleshooting and maintenance as well as improve performance. An enterprise should evaluate their current programming practices from other areas (such as code structure and variable naming standards) to adapt for use when coding Groovy and other scripts in Actions Pro.
Input and Output Parameters
- Do not use the literal substitution form of INPUTS ($INPUT{<name>}) in the Content of a Remote ActionTask. Though the substitution and code execute, this usage causes a form of memory leak that compromises performance and reliability.
- To improve reusability, troubleshooting, and Runbook maintenance, ActionTasks should use only INPUTS and OUTPUTS, and avoid FLOWS, PARAMS, and WSDATA. INPUTS can have their values assigned to other variable types in the Runbook "Edit Inputs" settings. OUTPUTS can be assigned to FLOWS, PARAMS, and WSDATA in the "Edit Outputs" settings in a Runbook.
- Do not use PARAMS as the default values for the INPUT parameter in an ActionTask definition. This sets the INPUT to the value of the PARAM at the start of the Runbook and not to the value at the point of execution. This complicates troubleshooting.
- Use GLOBALS only when values must be saved when using targets or on merged paths. Global variable names on each merged path or for each target must be unique to be retained after merging.
- Use
$PROPERTY{<XXX>}in the "Default Value" to set ActionTask property values to an INPUT. - Use only
$PROPERTY{}and constant values for default values in the ActionTask definition and use the Automation Model to set FLOWS, PARAMS, or WSDATA values.